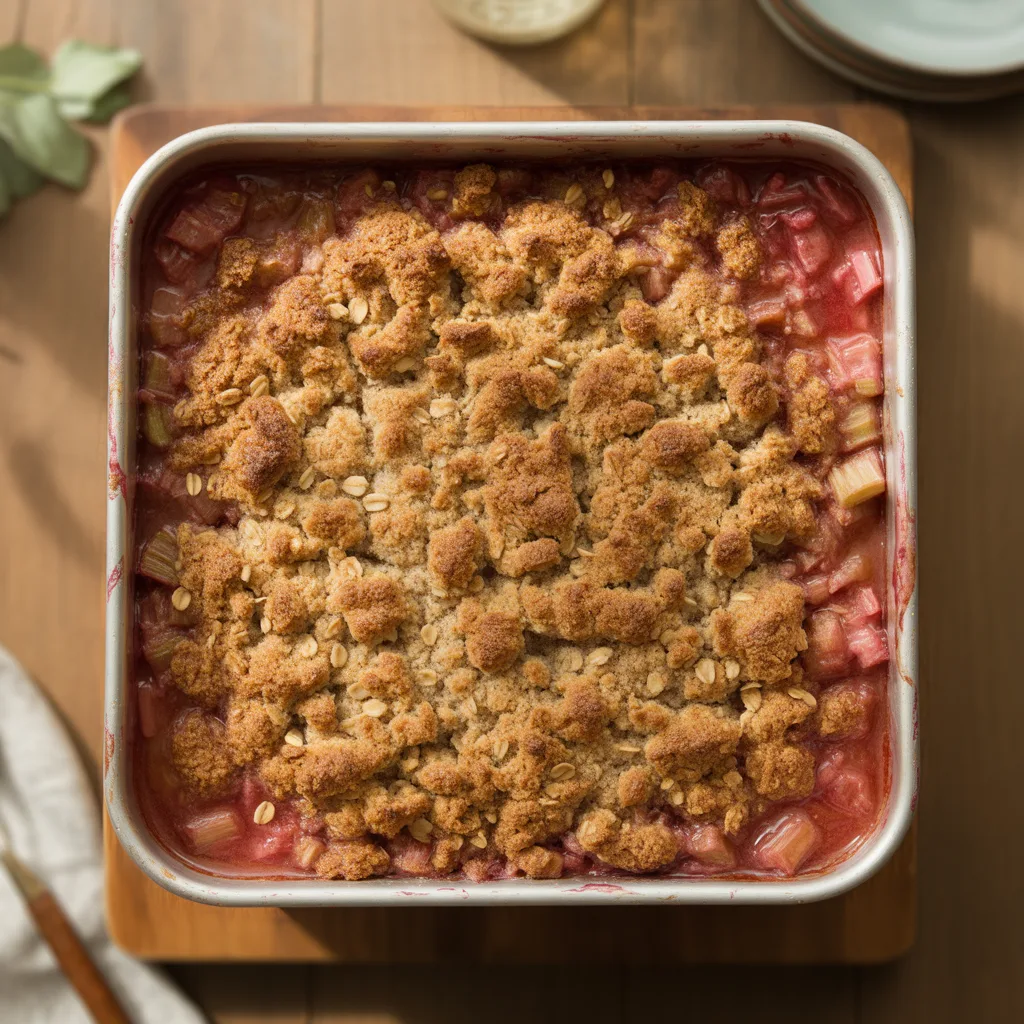
Is there anything quite as wonderfully American as a warm fruit crisp bubbling away in the oven? It’s that perfect bridge between a busy weekday and a comforting dessert that feels like a hug. This Classic Old-Fashioned Rhubarb Crisp with Oat Crumble Topping takes me right back to my grandma’s kitchen, where the tartness of spring rhubarb was always tamed by a sweet, buttery blanket of oats. It’s not fussy, it doesn’t require any special skills, and it’s forgiving enough for a handful of substitutions if that’s what your pantry dictates. Honestly, if you’ve never baked with rhubarb before, this is the absolute best place to start.
Why You’ll Love This
This recipe is a true crowd-pleaser for so many reasons. First, it’s incredibly easy. You don’t need a pastry blender or any fancy equipment—just a bowl, your hands, and a baking dish. The filling comes together in minutes, and the topping is that irresistible oat crumble we all dream of. Second, it’s the perfect way to celebrate spring produce when rhubarb is at its peak. That bright, tangy flavor is so, so refreshing after the heavier desserts of winter. And finally, it’s versatile. Serve it warm with a scoop of vanilla ice cream for the ultimate comfort dessert, or enjoy it cold for breakfast (I won’t tell!). It’s a dessert that feels special but is completely approachable.
Ingredients You’ll Need
Let’s talk ingredients. The beauty here is in the simplicity. For the Rhubarb Filling:
- 6 cups fresh rhubarb, cut into 1/2-inch pieces: This is the star, providing that signature tart flavor.
- 3/4 cup granulated sugar: Sweetens the tart rhubarb perfectly.
- 1/4 cup all-purpose flour: Helps thicken the juicy filling.
- 1 teaspoon vanilla extract: Adds a warm, classic dessert flavor.
- 1/4 teaspoon salt: Balances all the sweetness and enhances the fruit.
For the Oat Crumble Topping:
- 1 cup old-fashioned oats: The base for that chewy, crispy texture.
- 1/2 cup all-purpose flour: Binds the topping together.
- 1/2 cup packed light brown sugar: Adds a deep caramel-like sweetness.
- 1/2 cup (1 stick) cold unsalted butter, cubed: The key to a flaky, crisp topping.
- 1/2 teaspoon ground cinnamon: A warm spice that pairs beautifully with rhubarb.
- 1/4 teaspoon salt: Again, just to balance everything out.
Let’s Get Cooking Step by Step
Ready to make your kitchen smell amazing? Here’s how to build this classic rhubarb crisp, step by step.
- Prep your station. Preheat your oven to 375°F (190°C). Grab a 9×9-inch baking dish or a similar-sized oven-safe skillet and give it a light coating of butter or a quick spritz of non-stick spray.
- Make the filling. In a large mixing bowl, toss the chopped rhubarb with the granulated sugar, 1/4 cup of flour, vanilla, and salt. Keep tossing until the rhubarb pieces are evenly coated. Pour this mixture into your prepared baking dish and spread it into an even layer.
- Create the oat crumble. This is the fun part! In the same bowl (no need to wash it—we’re saving dishes!), combine the oats, 1/2 cup flour, brown sugar, cinnamon, and salt. Add the cold, cubed butter. Now, use your fingertips to work the butter into the dry ingredients. You’re looking for a crumbly mixture with pebble-sized bits of butter throughout. Don’t overmix—those butter pieces are what create the delightful crispiness.
- Assemble and bake. Sprinkle the oat crumble topping evenly over the rhubarb filling, covering it completely. Don’t press it down; just let it rest loosely on top.
- Bake to perfection. Place the dish in the preheated oven and bake for 35-45 minutes. You’ll know it’s done when the filling is bubbly around the edges and the topping is a beautiful golden brown. So good.
- Let it rest. This is crucial! Let the crisp rest for at least 20-30 minutes before serving. This allows the filling to thicken up beautifully so it’s not runny.
Oven Temperatures for Perfect Crisp
The right temperature is key for a crisp that’s, well, crisp! 375°F (190°C) is our sweet spot. It’s hot enough to cook the rhubarb through and get that filling bubbling without burning the oat topping too quickly. If you notice your topping is browning faster than you’d like, don’t panic. Just loosely tent a piece of aluminum foil over the top for the last 10-15 minutes of baking. Every oven is a little different, so keep an eye on it, especially the first time you make it. That gorgeous golden-brown color is your best indicator of doneness.
Variations & Substitutions
One of the best things about a fruit crisp recipe is how adaptable it is. Here are some of my favorite twists:
- Strawberry Rhubarb Crisp: This is a classic combo! Simply replace 2 cups of the rhubarb with 2 cups of hulled and halved strawberries. The berries add a lovely sweetness.
- Gluten-Free: Easy! Use a 1:1 gluten-free all-purpose flour blend in place of the regular flour in both the filling and the topping. Ensure your oats are certified gluten-free.
- Vegan: Swap the butter for an equal amount of solid coconut oil or a plant-based butter substitute. The result is just as delicious.
- Nutty Crumble: Add 1/2 cup of chopped pecans or walnuts to the oat crumble topping for extra crunch and flavor.
- Add Some Spice: A pinch of nutmeg or cardamom mixed in with the cinnamon can add a lovely warm depth.
Serving Ideas & Pairings
While this rhubarb crisp is fantastic all on its own, why not make it an event?
- The Classic: A generous scoop of high-quality vanilla ice cream is non-negotiable for me. The hot crisp and cold ice cream are a match made in heaven.
- A Lighter Touch: A dollop of freshly whipped cream or even a splash of cold heavy cream poured right over the top is wonderfully simple.
- For Breakfast: Yes, really. It’s basically baked fruit and oats! Enjoy a small portion chilled or lightly warmed with a spoonful of Greek yogurt.
- Perfect Pairings: Serve it after a simple grilled chicken dinner or a fresh spring salad. The tangy dessert cuts through richer meals beautifully.
Storage & Reheating
Got leftovers? Lucky you! Here’s how to keep them tasting great.
- Fridge: Let the crisp cool completely, then cover the baking dish tightly with plastic wrap or transfer portions to an airtight container. It will keep beautifully in the refrigerator for up to 4 days.
- Freezer: You can freeze the baked and cooled crisp for up to 3 months. Wrap it tightly in a few layers of plastic wrap and then aluminum foil. Thaw overnight in the refrigerator before reheating.
- Reheating: To bring back that just-baked magic, reheat individual portions in the microwave for about 60-90 seconds. For the whole dish, pop it into a 350°F oven for 15-20 minutes, or until warmed through. The topping will re-crisp nicely.
Frequently Asked Questions
Let’s tackle a couple of common questions about rhubarb recipes, especially this crisp.
- Do I need to peel the rhubarb? Nope! The skin on rhubarb stalks is thin and perfectly edible. Just give them a good wash, trim off the leaves (which are toxic and should never be eaten), and chop away.
- Can I use frozen rhubarb for this rhubarb crisp recipe? Absolutely. There’s no need to thaw it first. Just toss the frozen rhubarb directly with the filling ingredients. You may need to add 5-10 minutes to the baking time since you’re starting with a colder base.
- My filling is a bit runny. What happened? This can happen if the crisp isn’t allowed to rest long enough after baking. The flour needs that cooling time to fully thicken the juices. If it’s still too runny for your liking next time, you can add an extra tablespoon of flour to the filling mixture.
- Can I make this fruit crisp ahead of time? You sure can. Assemble the crisp completely, cover it tightly, and refrigerate it for up to 24 hours before baking. You might need to add a few extra minutes to the bake time since it will be going into the oven cold.
And that’s it! You’re now fully equipped to create this unforgettable Classic Old-Fashioned Rhubarb Crisp with Oat Crumble Topping. It’s a dessert that’s sure to become a spring tradition in your home, just like it is in mine.
