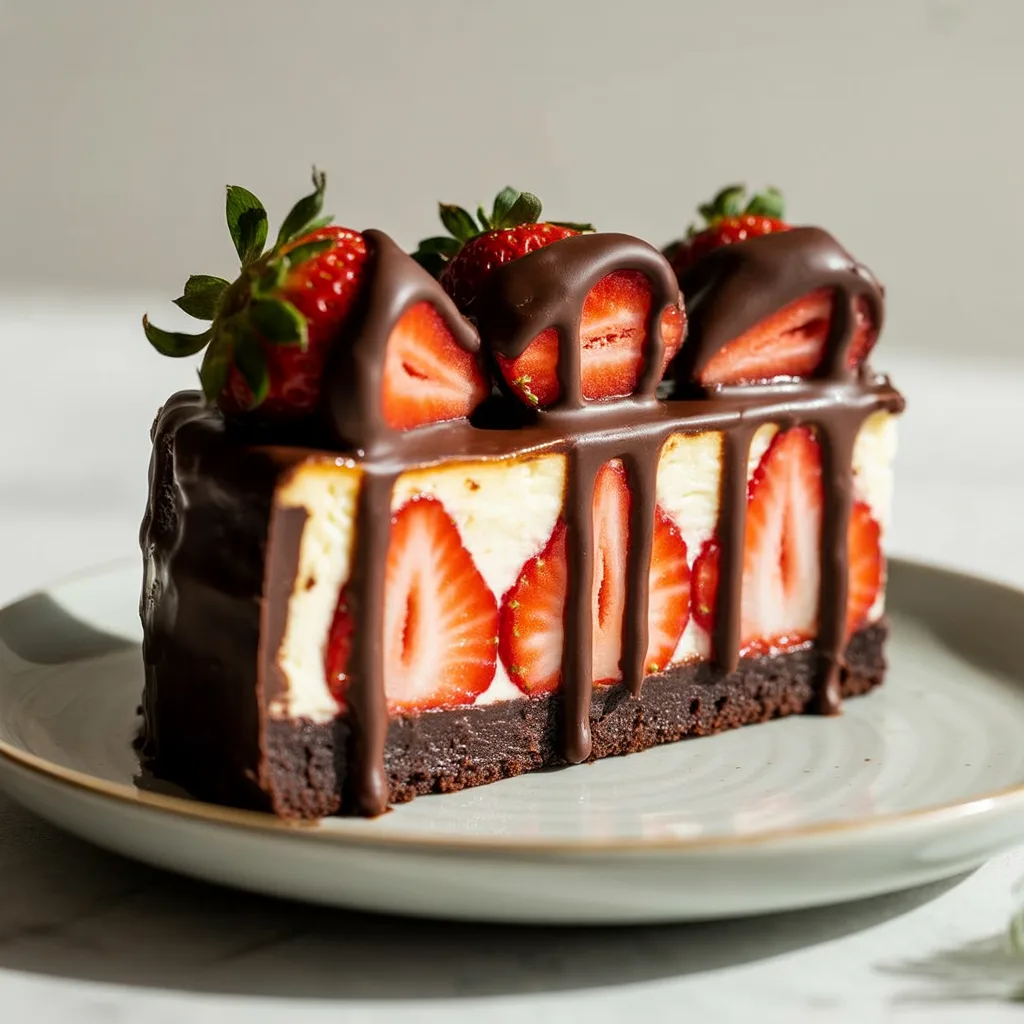
Is there anything more dreamy than the combination of creamy cheesecake, rich chocolate, and fresh strawberries? This Chocolate Covered Strawberry Cheesecake is the answer to your dessert dilemmas. It’s the kind of showstopper that looks like it came from a fancy bakery but is secretly totally doable in your own kitchen. Honestly, it’s my go-to for birthdays, summer potlucks, or just when you need a little bit of luxurious comfort. So good.
Why You’ll Love This
You’ll love this recipe because it combines three incredible desserts into one unforgettable experience. It’s got the fudge-y depth of a chocolate cake, the smooth, tangy creaminess of the best cheesecake recipe, and the sweet, fresh burst of chocolate-dipped strawberries right on top. And the best part? You don’t need any fancy equipment. A simple springform pan and a couple of bowls are all it takes to create this masterpiece. It’s the perfect centerpiece for your table and is sure to have everyone asking for the recipe.
Ingredients You’ll Need
- For the Chocolate Cake Layer: 1 box devil’s food cake mix, plus the oil, water, and eggs it calls for. This creates a perfectly moist and reliable base.
- For the Cheesecake Layer: 3 (8 oz) blocks full-fat cream cheese, softened. This is key for a smooth, lump-free filling.
- 1 cup granulated sugar. For that classic sweet tang.
- 3 large eggs, at room temperature. They incorporate much better into the batter.
- 1 cup sour cream. This is the secret to an ultra-creamy texture.
- 2 tsp pure vanilla extract. For that warm, essential flavor.
- For the Topping: 1 lb fresh strawberries, washed and dried thoroughly.
- 1 cup semi-sweet chocolate chips. For melting and dipping.
- 1 tsp coconut oil. This helps the chocolate coating become smooth and shiny.
Let’s Get Cooking Step by Step
- Heat your oven to 350°F (175°C). Grease the bottom and sides of a 9-inch springform pan. A little pat of butter or a quick spritz of cooking spray will do the trick.
- Prepare the chocolate cake layer according to the directions on the box. Pour the batter into your prepared springform pan, spreading it into an even layer. It won’t be very thick, and that’s just right. Pop it in the oven for 15-18 minutes, just until the top is set and a toothpick comes out with a few moist crumbs. It will finish baking later with the cheesecake. Let it cool on a wire rack while you make the filling.
- In a large bowl, beat the softened cream cheese and sugar together with an electric mixer on medium speed until it’s completely smooth and creamy. No lumps allowed! This should take about 2-3 minutes. Scrape down the sides of the bowl.
- Add the eggs one at a time, beating on low speed just until each egg is blended in. Overmixing at this stage can incorporate too much air and lead to cracking. After the last egg is in, beat in the sour cream and vanilla extract just until everything is combined and smooth.
- Carefully pour the cheesecake filling over the slightly cooled chocolate cake base. Gently tap the pan on the counter a few times to release any large air bubbles.
- Place the springform pan on a baking sheet (this catches any potential butter leaks) and bake for 55-65 minutes. The edges should be set, but the center will still have a slight jiggle—like Jell-O—when you gently shake the pan. That’s how you know it’s perfect.
- Turn the oven off, crack the door open, and let the cheesecake cool slowly inside for about an hour. This gradual temperature change is the best defense against cracking. Then, remove it from the oven and let it cool completely on the counter before covering it and moving it to the fridge to chill for at least 6 hours, but preferably overnight.
- Right before serving, melt the chocolate chips and coconut oil together in the microwave in 30-second bursts, stirring between each, until smooth. Dip each strawberry about halfway into the melted chocolate, let the excess drip off, and place them on a parchment-lined plate. Chill for 10 minutes to set the chocolate, then arrange them beautifully on top of your chilled cheesecake.
Decadent Cheesecake Variations & Substitutions
This recipe is wonderfully forgiving. For a fun twist, try a Biscoff cheesecake layer by swapping ½ cup of the sugar for ½ cup of crushed Biscoft cookie crumbs and adding a teaspoon of cinnamon to the filling. If raspberry is more your thing than strawberry, you can easily create a stunning raspberry cake vibe by swapping the strawberries for fresh raspberries and even swirling a few tablespoons of seedless raspberry jam into the cheesecake filling before baking. For a lighter option, you can use Neufchâtel cheese instead of full-fat cream cheese and light sour cream, though the texture will be slightly less rich. And if you need a gluten-free version, simply use your favorite gluten-free chocolate cake mix for the base.
Perfect Chocolate Cake Layer Tips
The cake layer is your foundation, so you want it to be just right. The biggest tip is to not overbake it during its first trip to the oven. You’re just giving it a head start, not baking it all the way through. It should still look a little wet in the center when you pull it out. Letting it cool for at least 15-20 minutes before adding the cheesecake batter is crucial. If it’s too hot, it will start to cook the eggs in your filling. And don’t worry if the cake seems thin—it’s supposed to be! It will rise a bit more and become a perfect, fudgy layer beneath the creamy cheesecake.
Serving Ideas & Cheesecake Toppings
The chocolate-covered strawberries are a classic topping, but don’t stop there! The world of cheesecake desserts is your oyster. For a different aesthetic, drizzle extra melted chocolate and a handful of fresh raspberries over the top. A dusting of cocoa powder or powdered sugar always looks elegant. For mini desserts, you can make this in a muffin tin lined with parchment liners—just reduce the baking time to about 20-25 minutes. Slice it cold for the cleanest cuts, wiping your knife clean between each slice for picture-perfect pieces.
Storage & Reheating Instructions
This cheesecake is a dream to make ahead. It stores beautifully in the refrigerator, covered tightly with plastic wrap or in an airtight container, for up to 5 days. You can also freeze the entire cheesecake (without the fresh strawberry topping) for up to 3 months. Wrap it securely in a layer of plastic wrap and then a layer of aluminum foil to prevent freezer burn. Thaw it overnight in the refrigerator before adding your chocolate-covered strawberries and serving. I don’t recommend reheating this cheesecake, as it’s meant to be enjoyed cold.
Frequently Asked Questions
Can I use a different pan if I don’t have a springform pan?
A 9-inch round cake pan can work in a pinch, but getting the slices out cleanly will be very tricky. The springform pan’s removable sides are what make this work so well. If you only have a cake pan, I’d strongly recommend lining the bottom with parchment paper for easier removal.
Why did my cheesecake crack?
Cracking usually happens from a sudden temperature change or from overmixing the batter, which incorporates too much air. The slow cooling process in the turned-off oven is the best way to prevent this. But hey, if it does crack, just cover it with your gorgeous chocolate-covered strawberries! No one will ever know.
Can I make this without the boxed cake mix?
Absolutely! You can use your favorite homemade chocolate cake recipe. You’ll need enough batter for a single 9-inch layer. Just par-bake it for about 10-12 minutes before adding the cheesecake layer and continuing with the recipe.
What other cheesecake toppings work well here?
The options are endless! A hot fudge or caramel sauce drizzle is always a hit. For a crunch, sprinkle on some chopped nuts or toffee bits. Fresh berries, whether strawberries, raspberries, or a mix, are always a refreshing and beautiful choice for any cheesecake decoration.
