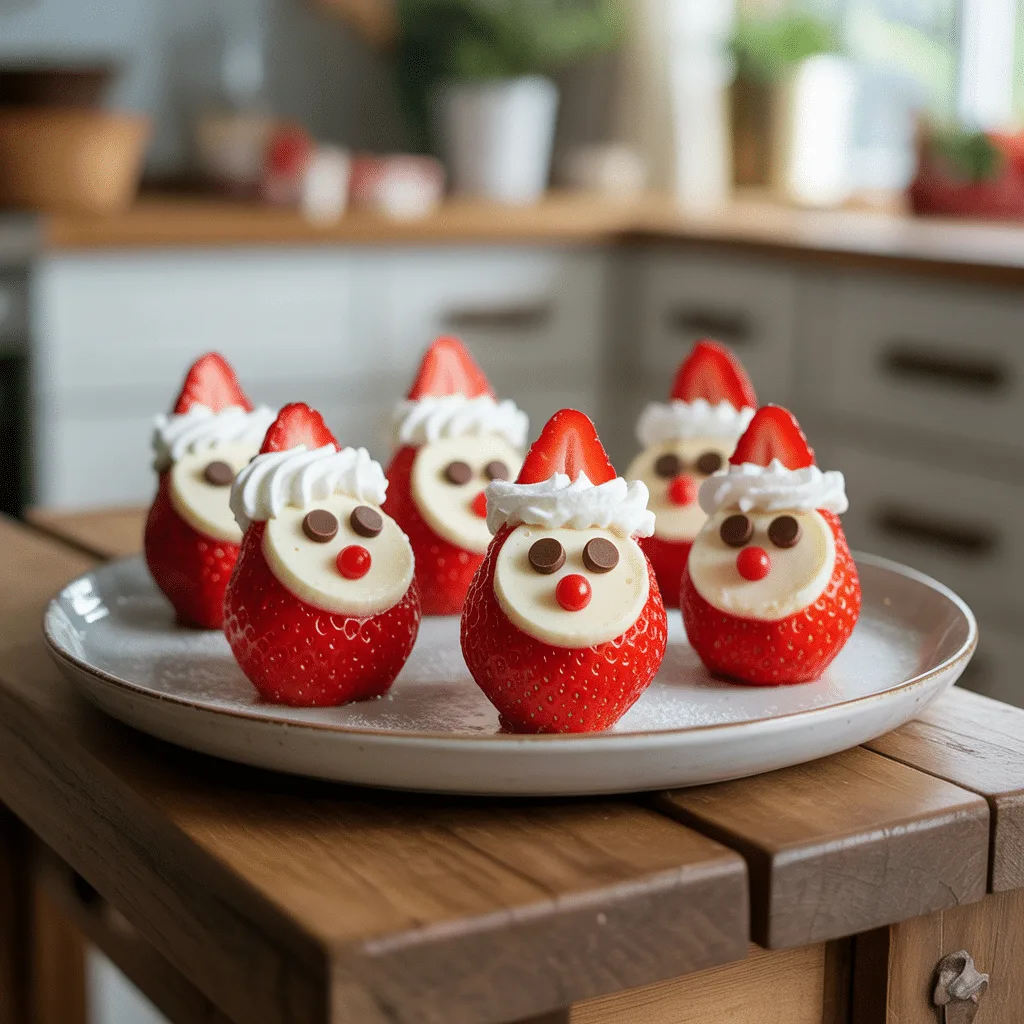
Is there anything more charming than a dessert that makes everyone smile? These adorable Strawberry Santas with Cheesecake Filling are exactly that—a festive, fun, and downright delicious treat that’s perfect for the holiday hustle. They look like they took hours, but I promise, they come together in a flash. No fancy skills required, just a little bit of fun. They’re the perfect project to get the kids involved in or to whip up when you need a last-minute showstopper for the cookie exchange. Who says holiday magic has to be complicated?
Why You’ll Love This
You’re going to adore these little guys for so many reasons. First, they’re incredibly easy. We’re talking about 20 minutes from start to finish, making them one of those simple Christmas desserts that feel special without the stress. Second, they’re a total crowd-pleaser. I’ve brought these to more than a few holiday parties, and they’re always the first treat to disappear from the platter. Kids and adults alike can’t resist them. And honestly, the combination of sweet, juicy strawberry, creamy cheesecake filling, and that cute little hat is just so, so good. It’s a holiday treat that delivers on both flavor and festive cheer.
Ingredients You’ll Need
- 1 lb large fresh strawberries (about 12-15): Look for berries that are wide at the base and have a nice pointy tip for the perfect Santa shape.
- 4 oz cream cheese, softened: This makes the filling smooth and easy to pipe.
- 1/4 cup powdered sugar: Sweetens the filling without making it grainy.
- 1/2 tsp vanilla extract: Adds that classic, warm cheesecake flavor.
- 1/4 cup heavy whipping cream: Helps whip the filling into a light, fluffy consistency.
- Mini chocolate chips or black decorating gel: For the eyes! Chocolate chips are my go-to for ease.
- 1 tube red decorating icing or a small tube of red gel icing: This is for the little button nose.
Let’s Get Cooking Step by Step
- First, wash your strawberries and pat them completely dry with a paper towel. This is key so our cheesecake filling sticks. Carefully slice off the very tip of the green leafy stem to create a flat base. Then, from the pointed tip of the berry, slice off the top third. This top piece will become Santa’s hat.
- Now, using a small paring knife or a strawberry huller, carefully carve out a small cone-shaped section from the center of the larger strawberry base. You don’t need to go too deep; just create a little pocket for our filling. Set all your strawberry pieces aside.
- In a medium bowl, use a hand mixer to beat the softened cream cheese, powdered sugar, and vanilla together until it’s completely smooth and creamy. This should take about 2 minutes.
- Pour in the heavy whipping cream. Beat the mixture on medium-high speed for another 2-3 minutes, until it becomes light, fluffy, and holds stiff peaks. You’ll know it’s ready when the beaters leave a clear trail in the mixture.
- Scoop your fluffy cheesecake filling into a piping bag fitted with a large star tip. If you don’t have a piping bag, a sturdy plastic bag with a corner snipped off works just perfectly.
- Pipe a tall, generous swirl of the cheesecake filling onto the flat top of your strawberry base. The fluffier, the better!
- Gently place the reserved strawberry top (the hat!) onto the peak of the cheesecake filling swirl. Give it a little press to secure it.
- Finally, use your mini chocolate chips or a dot of black gel to add two eyes near the base of the hat. Then, add a tiny dot of red icing right below the eyes for Santa’s cheerful little nose. And you’re done!
Holiday Baking Tips For Perfect Strawberry Santas
- Choose your strawberries wisely. The best ones for this are firm, ripe, and have a classic Santa-like shape—wide at the bottom with a good point on top.
- Make sure your cream cheese is truly softened. If it’s still cold, you’ll end up with lumpy filling instead of something smooth and pipeable.
- Don’t skip whipping the heavy cream into the mix. This step is what gives the filling its light, airy texture and makes it hold its shape so well on the strawberry.
- If your filling seems a bit too soft to pipe after whipping, just pop the whole bowl into the refrigerator for 10-15 minutes to firm up. It makes a world of difference.
- Get the kids involved! They are absolute experts at placing the chocolate chip eyes and can handle the decorating part with glee.
- Work quickly once they’re assembled. These Christmas treats are best served the same day, so assemble them within an hour or two of your party for the freshest look and taste.
Variations & Substitutions for Your Strawberry Santas
This recipe is wonderfully adaptable. For a lighter twist, you can use Neufchâtel cheese instead of full-fat cream cheese—it has a very similar texture and flavor. If you need a dairy-free version, my go-to is using a tub of store-bought dairy-free cream cheese alternative. Just be sure to whip it well with the powdered sugar and vanilla first. Not a fan of vanilla? A tiny drop of almond extract is a lovely change-up. And for the hat, if you want to get really fancy, you could even use a small marshmallow or a piece of a red Mike & Ike candy instead of the strawberry top! Honestly, the possibilities are endless for these Christmas food ideas.
Serving Ideas & Pairings for Festive Occasions
These Strawberry Santas are stars on their own, but they play well with others too. Arrange them on a platter as the centerpiece of your holiday desserts table. They look gorgeous surrounded by other easy Christmas desserts like sprinkle cookies or chocolate-dipped pretzels. For a real holiday party desserts spread, I love serving them alongside a plate of savory Christmas appetizers like mini quiches or baked brie with crackers. The sweet and savory combo is always a hit. They also make a delightful, light finish to a heavy holiday meal. And a little pro tip: serve them with a cup of hot cocoa or peppermint coffee. So good.
Storage & Reheating Instructions for Leftovers
These treats are absolutely best enjoyed the day they are made. The strawberries will slowly start to release their juice, which can make the filling a little soft and the berries less firm. But if you do have leftovers, carefully place them in a single layer in an airtight container. Store them in the refrigerator for up to 24 hours. I don’t recommend freezing them, as the texture of the strawberry and filling will change dramatically when thawed. There’s no reheating needed—just enjoy them cold straight from the fridge!
Frequently Asked Questions
- Can I make these ahead of time? You can prepare the cheesecake filling up to two days in advance. Keep it stored in an airtight container in the fridge. When you’re ready to serve, give it a quick stir, pipe it onto your prepped strawberries, and decorate. This is one of my favorite make-ahead strategies for easy holiday desserts.
- My filling is runny. What happened? This usually means the cream cheese was too warm or the heavy cream wasn’t whipped enough. Next time, make sure both your cream cheese and cream are cold before whipping, and beat until you see those stiff peaks. If it happens, just chill the filling for 20 minutes to firm it up.
- What’s the best way to transport these? For Christmas party desserts on the go, use a container with a flat base. Place the Strawberry Santas in a single layer and, if you can, put a non-slip liner (like a paper towel or a fancy doily) underneath them to keep them from sliding around in the car.
- Are there any other fruit options? While strawberries are classic, you could try this with large, firm raspberries for a different look! They’ll be a bit more delicate, but just as tasty and perfect for your holiday treats platter.