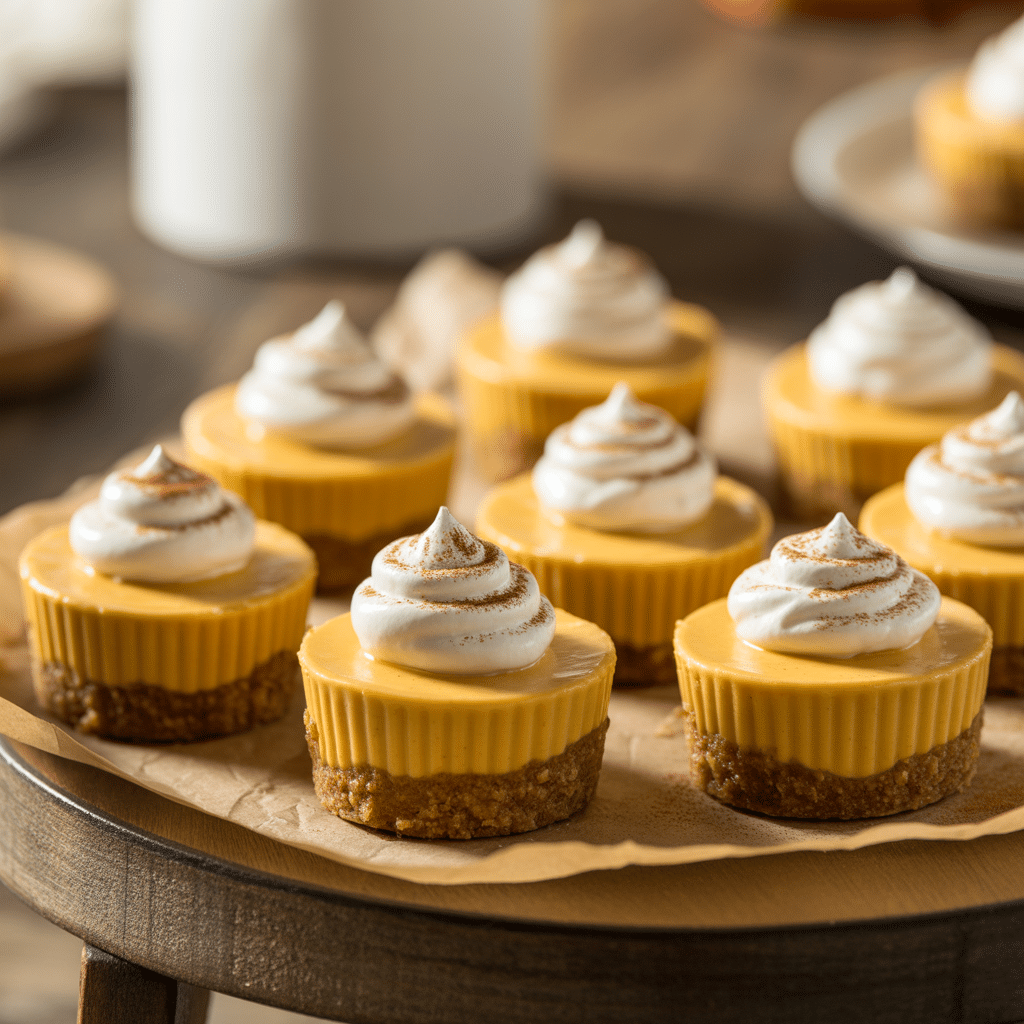
Feeling that Thanksgiving pressure to bring something delicious, impressive, and maybe just a little bit healthier to the table? We’ve all been there, staring into the abyss of a hot oven, wondering how we’ll possibly fit one more dish in. What if you could whip up a crowd-pleasing dessert that requires zero oven time and comes together in just a few simple steps? That’s the magic of these No-Bake Pumpkin Pie Bites. They’re the perfect little solution for a busy host or a guest looking for the easiest things to take to Thanksgiving dinner.
Why You’ll Love This
Honestly, these might just become your new Thanksgiving tradition. They capture the soul-soothing flavor of classic pumpkin pie but in a fun, bite-sized, and no-fuss package. We’re talking all the cozy, spiced pumpkin flavor you crave without ever turning on your oven. They’re the ultimate make-ahead dessert, so you can cross one thing off your to-do list days in advance. And because they’re no-bake, they’re perfect for enlisting little helpers in the kitchen—some of my best memories are of my grandma letting me press crust into pans. So good.
Ingredients You’ll Need
- 1 ½ cups graham cracker crumbs: Forms the simple, classic crust we all know and love.
- ½ cup melted coconut oil (or unsalted butter): Binds the crust together and adds richness.
- ¼ cup pure maple syrup: Sweetens the crust naturally and adds a warm depth of flavor.
- 1 (15 oz) can pure pumpkin puree: The star of the show! Make sure it’s not pumpkin pie filling.
- 1 (8 oz) block cream cheese, softened: Creates the lusciously creamy filling base.
- ½ cup powdered sugar: Sweetens and helps thicken the filling without graininess.
- 1 teaspoon vanilla extract: Enhances all the other flavors in the filling.
- 1 ½ teaspoons pumpkin pie spice: That essential, cozy spice blend that screams fall.
- A pinch of sea salt: Balances the sweetness and makes the flavors pop.
- Whipped cream for serving: Because it’s just not the same without a little cloud on top.
Let’s Get Cooking Step by Step
- First, let’s make the crust. In a medium bowl, combine the graham cracker crumbs, melted coconut oil (or butter), and maple syrup. Stir everything together until it looks like wet sand and the crumbs are fully coated.
- Grab a mini muffin tin and line it with paper liners. This makes removing the bites so much easier later. Spoon about one tablespoon of the crust mixture into each liner. Use your fingers or a small tool to press it down firmly into an even layer. Pop the whole tin into the fridge for 15 minutes to let it set.
- While the crust chills, make the filling. In a large bowl, use an electric hand mixer to beat the softened cream cheese until it’s completely smooth and fluffy. This should take about 1-2 minutes.
- Add the pumpkin puree, powdered sugar, vanilla extract, pumpkin pie spice, and that pinch of salt to the bowl with the cream cheese. Beat everything together on medium speed until it’s perfectly combined, smooth, and creamy. Scrape down the sides of the bowl once to make sure there are no lumps of cream cheese hiding.
- Take your chilled crusts out of the fridge. Pipe or spoon the pumpkin filling on top of each crust, dividing it evenly among all the cups. You can smooth the tops with a butter knife or the back of a spoon.
- Return the filled tin to the refrigerator and let the bites chill for at least 3-4 hours, or ideally overnight. This firm-up time is crucial for that perfect, sliceable pie texture.
- When you’re ready to serve, gently pop the bites out of the liners, add a tiny dollop of whipped cream, and maybe an extra sprinkle of spice. That’s it!
Tips For Success With No-Bake Pumpkin Pie Bites
- For a super smooth filling, make sure your cream cheese is truly at room temperature. If it’s still cool, you might end up with little lumps.
- Press, press, press that crust! Really pack it into the liners so it holds together when you take a bite.
- Don’t rush the chilling time. Letting them set overnight is the secret to the best texture.
- If you’re in a time crunch, you can pop the pan into the freezer for about an hour to speed things up.
- For easy piping, spoon the filling into a plastic zip-top bag, snip off one corner, and pipe away. No fancy pastry bag needed.
- And a little mess is just a sign of a good time. I’ve had more than my share of filling on my apron!
Variations & Substitutions to Try
- Gluten-Free: Swap the graham crackers for your favorite gluten-free cookie crumbs, like gluten-free gingersnaps for a spicy twist.
- Dairy-Free: Use a plant-based cream cheese and coconut whipped cream. The coconut oil in the crust already works perfectly.
- Nutty Crust: Replace half of the graham cracker crumbs with finely ground pecans or walnuts for a delicious, toasty flavor.
- Chocolate Drizzle: Melt some chocolate chips with a teaspoon of coconut oil and drizzle it over the chilled bites for a fancy finish.
- Gingersnap Crust: For a deeper spice flavor, use crushed gingersnap cookies instead of graham crackers.
Serving Ideas & Pairings for Thanksgiving
These bites are fantastic all on their own, but they truly shine as part of a bigger spread. They make for such fun pumpkin pie dessert ideas arranged on a platter right next to the traditional pie—giving your guests a choice without any extra work for you. They pair beautifully with a warm cup of coffee after the big meal or a glass of cold apple cider. I love setting out a little toppings bar with extra whipped cream, a sprinkle of cinnamon, and some crushed pecans so everyone can customize their own. They’re one of those easy Thanksgiving treats to make that look like you spent hours, and they free up precious oven space for the turkey and sides.
Storage & Reheating Tips for Leftovers
These No-Bake Pumpkin Pie Bites are champions in the fridge. Just keep them stored in a single layer in an airtight container. They’ll stay fresh and delicious for up to 4 days. If you need to stack them, place a piece of parchment paper between the layers to prevent sticking. You can also freeze them for longer storage! Arrange them on a baking sheet to freeze solid first (about 2 hours), then transfer them to a freezer-safe bag or container. They’ll keep for up to 2 months. Thaw them in the refrigerator overnight before serving. No reheating needed—they are meant to be enjoyed cold and creamy!
Frequently Asked Questions
- Can I make these bites ahead of time? Absolutely! In fact, I highly recommend it. Making them a day or two in advance allows the flavors to meld together perfectly and gives them plenty of time to set up firmly in the fridge. They are the ultimate make-ahead dessert for your healthy Thanksgiving food ideas list.
- My filling is a little soft. What did I do wrong? This usually means they just need more time to chill. The coconut oil in the crust and the cream cheese both need ample time to firm up. Pop them back in the fridge (or even the freezer for a bit) and they should be perfect. Also, double-check that you used pumpkin puree and not the canned pumpkin pie filling, which has more moisture.
- Are there any other pie inspired desserts I can make with this method?For sure! This no-bake method is so versatile. You could easily swap the pumpkin for sweet potato puree, or do a lemon version using lemon juice and zest for a refreshing twist. The possibilities are endless for creating other easy things to bring to Thanksgiving.


