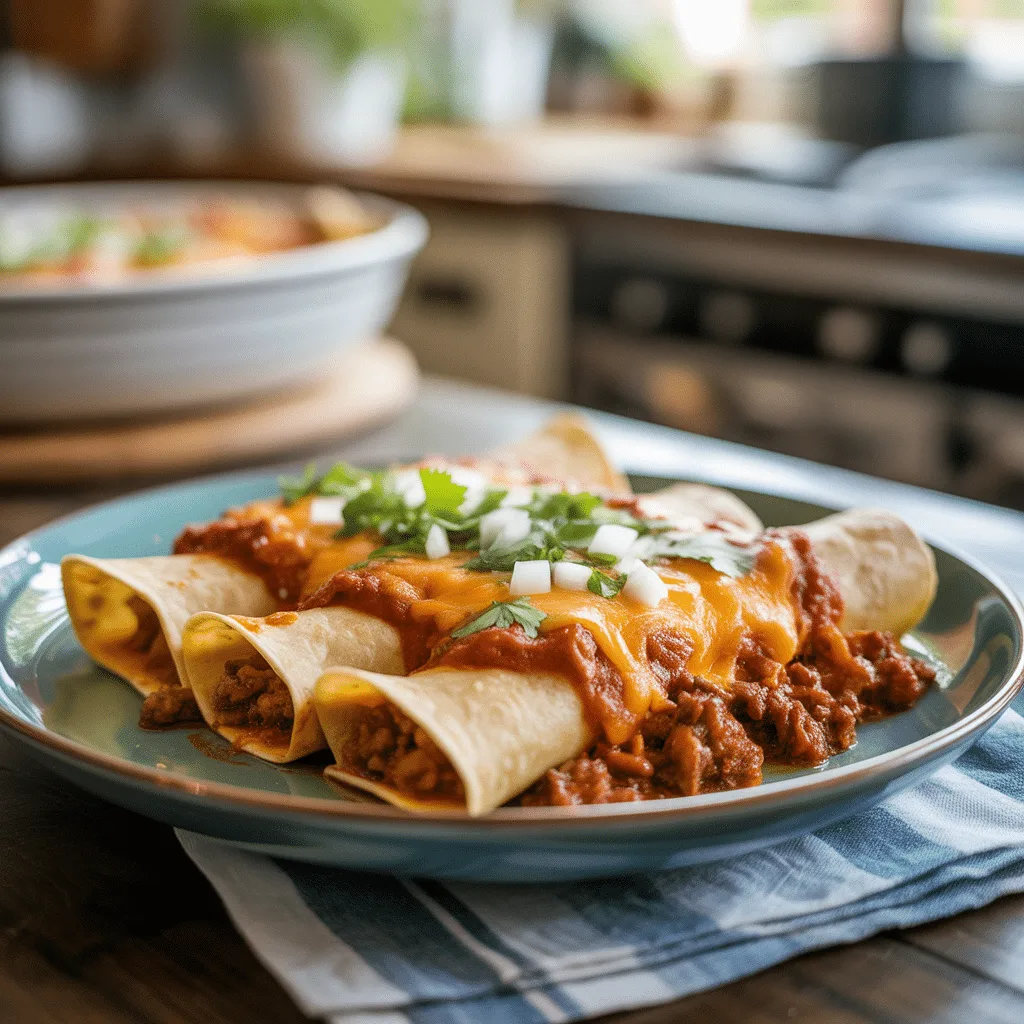
Is there anything more comforting than a bubbling pan of enchiladas coming out of the oven? That smell alone can turn a chaotic weeknight into something special. These Cheesy Beef Enchiladas are my go-to when I need a dinner that feels like a hug, but without spending all evening in the kitchen. They’re hearty, they’re cheesy, and they’re a guaranteed crowd-pleaser for the whole family. Honestly, if you’re looking for easy meals that don’t skimp on flavor, you’ve just found your new favorite.
Why You’ll Love This
You’re going to love this recipe because it’s designed for real life. It uses simple, affordable ingredients you can find at any grocery store, making it a perfect choice for cheap dinners for a family. The process is straightforward—no fancy techniques required. It’s one of those quick dinner ideas that yields a dish so, so comforting. Plus, you can customize it a million different ways to suit your taste. It’s a forgiving recipe, perfect for a busy cook.
Ingredients You’ll Need
- 1 tablespoon olive oil: For sautéing our onions and beef.
- 1 medium yellow onion, diced: Adds a sweet, savory base flavor.
- 1 pound lean ground beef: The hearty, protein-packed star of our filling.
- 2 cloves garlic, minced: For that essential aromatic punch.
- 1 tablespoon chili powder: The foundation of our warm, smoky flavor.
- 1 teaspoon ground cumin: Adds a deep, earthy note.
- 1/2 teaspoon smoked paprika: Gives a subtle smokiness.
- 1 (10-ounce) can red enchilada sauce: The shortcut to major flavor.
- 8-10 (6-inch) corn or flour tortillas: Your vessel for all that cheesy goodness.
- 2 cups shredded Mexican blend cheese: Because more cheese is always better.
- Optional toppings: chopped cilantro, diced avocado, sour cream.
Let’s Get Cooking Step by Step
- Preheat your oven to 375°F (190°C). Grab a 9×13 inch baking dish and give it a light spray with cooking spray.
- In a large skillet, heat the olive oil over medium heat. Add the diced onion and cook for about 4-5 minutes, until it’s softened and a little translucent.
- Add the ground beef to the skillet, breaking it up with a spoon. Cook until it’s no longer pink, which should take about 6-8 minutes. If there’s a lot of grease, you can drain it off.
- Stir in the minced garlic, chili powder, cumin, and smoked paprika. Cook for just one more minute until the spices are fragrant.
- Pour in about 1/4 cup of the enchilada sauce into the beef mixture and stir it all together. This helps to bind the filling and keep it moist. Take the skillet off the heat.
- Now, warm your tortillas. This is a crucial step to prevent tearing! You can do this by wrapping them in a damp paper towel and microwaving for 30 seconds, or by quickly heating them one by one in a dry skillet.
- Spread a thin layer of the remaining enchilada sauce on the bottom of your prepared baking dish.
- Lay a tortilla flat. Spoon about 1/3 cup of the beef mixture down the center, then top with a generous pinch of cheese. Roll the tortilla up tightly and place it seam-side down in the baking dish. Repeat with the remaining tortillas and filling, packing them snugly in the dish.
- Pour the rest of the enchilada sauce over the top of the rolled enchiladas, making sure they’re well covered. Sprinkle the remaining cheese evenly over the top.
- Bake for 20-25 minutes, until the cheese is melted and bubbly and the edges of the tortillas are just starting to crisp up. Let it sit for 5 minutes before serving—this helps them set and makes them easier to serve.
Cheesy Beef Filling Tips
Getting the filling right is the key to amazing enchiladas. First, don’t skip warming the tortillas. A cold tortilla is much more likely to crack when you roll it. A quick zap in the microwave or a warm skillet makes them pliable. Second, don’t overfill them! About 1/3 cup of filling is the sweet spot. Too much and they’ll be hard to roll and might burst open. And when you’re assembling, pack those rolled enchiladas tightly in the pan so they support each other and don’t unroll. My playful tip? The cheese pull photo opportunity is a real thing—wait for that golden, bubbly top before you take it out.
Serving Ideas & Pairings
These enchiladas are a full meal on their own, but a couple of simple sides make it a feast. I love serving them with a crisp green salad with a lime vinaigrette to balance the richness. A side of cilantro-lime rice or simple black beans is always a hit. For a truly easy weeknight dinner, keep it simple with some store-bought tortilla chips and salsa. And don’t forget the toppings! Set out bowls of sour cream, diced avocado, fresh cilantro, and maybe some sliced jalapeños for those who like a little kick.
Variations & Substitutions
The beauty of this recipe is how adaptable it is. For a healthier twist, you can use ground turkey or even shredded chicken instead of beef. Want to sneak in some veggies? Try adding a cup of finely chopped spinach or zucchini to the beef mixture when you add the spices—they’ll blend right in. If you’re out of enchilada sauce, a can of seasoned tomato sauce mixed with extra chili powder and cumin works in a pinch. For a different cheese, Monterey Jack or a sharp cheddar are fantastic substitutes. And if you have a picky eater who doesn’t like sauce, you can leave it off their portion and just add extra cheese.
Storage & Reheating
Leftovers are arguably just as good the next day! Let the enchiladas cool completely, then store them in an airtight container in the refrigerator for up to 3-4 days. To reheat, the oven is best for keeping the tortillas from getting soggy. Pop them in a 350°F oven for 15-20 minutes, covered with foil. You can microwave them for a quick fix, but they might be a bit softer. They also freeze beautifully. Wrap the whole pan (if using a freezer-safe dish) or individual portions tightly in plastic wrap and foil. They’ll keep for up to 3 months. Thaw in the fridge overnight before reheating.
Frequently Asked Questions
- Can I make these Cheesy Beef Enchiladas ahead of time? Absolutely! You can assemble the entire dish, cover it tightly, and keep it in the refrigerator for up to 24 hours before baking. You might need to add a few extra minutes to the baking time since it will be going into the oven cold.
- Are corn or flour tortillas better for enchiladas? This is a matter of preference. Corn tortillas have a more traditional, authentic flavor and are gluten-free, but they can be more fragile. Flour tortillas are easier to roll and create a softer, more tender enchilada. I say use whichever you like best!
- How can I make this recipe spicier? If you love heat, there are a few easy ways to kick it up. Add a diced jalapeño (seeds and all) to the onion when you sauté it. You could also use a hot enchilada sauce or sprinkle a little cayenne pepper into the spice mix.
- What are some other healthy dinner ideas using these ingredients? For a lighter take, you can use the same savory beef filling to make a delicious taco salad over a bed of lettuce, or use it as a topping for baked sweet potatoes. It’s a very versatile base for all sorts of easy healthy dinner creations.
And that’s it, friends! I hope this recipe for Cheesy Beef Enchiladas brings as much joy to your table as it does to mine. It’s a true testament that the best dinner dishes are often the simplest.
